Friday, May 13, 2016

Sending mail in SQL Server 2008 R2 using Gmail SMTP Settings.

I was setting up database Mail in SQL Server 2008 R2 using Gmail SMTP settings (to testing) but not able to send mail as i was facing the below error " 

Message :
The mail could not be sent to the recipients because of the mail server failure. (Sending Mail using Account 1 (2016-05-13T14:47:58). Exception Message: Cannot send mails to mail server. (The SMTP server requires a secure connection or the client was not authenticated. The server response was: 5.5.1 Authentication Required. Learn more at).

To troubleshoot i  tried with Port enabled in firewall, changing port numbers but no luck got failed. Then after googling i find the below steps which made me to send mails successfully. 

 You may simply have to re-verify your client's access via the web. To do that:
However, if you use 2 step verification on your GMail account, don't forget that you will also need an application specific password for your client/device. See http://support.google.com/mail/bin/answer.py?hl=en&answer=1173270 for how to do that

If this doesn't worked then try with sending gmail from client machine if it works ok else enable the java settings in browser options. 

Wednesday, May 4, 2016

How to Transfer SQL Server Jobs Task from Source Server to Distention Server!

How i can transfer SQL Server jobs Task from Source Server to Distention Server without T-SQL Script ?

Answer :
We can do that by SSIS ” SQL SERVER INTEGRATION SERVICES ”  by creating new package on it to transfer the jobs task from one server to another server.
Note : also by SSIS i can trnsfer
1- Database Task
2- Error Massage Task
3- Login Task
4- Master Stored procedure Task
5- SQL Server objects Task

Demo to how to transfer SQL Server jobs task :
1- open Start menu >>> SQL Server >>>  SQL Server Business Intelligence Development Studio >>> File Menu >>> New >>> project >>> Select project type is Business Intelligence Projects from the left bar >>> select from the Right template Integration Services Project >>>write name for this Project EX (Transfer Jobs) >>> Choose your path to save the project >>> OK
Transfer Jobs_1
2- from the left Select from the Toolbox Menu under the Control flow items >>> Transfer job Task  >>> Drag and Drop this task on Control flow page >>> right click on the task >>> Select Edit .
 Transfer Jobs_2

3- After the Edit we will view New Screen ” Transfer Jobs Task Editor ” >>> Select jobs from the left bar .
4- We have 3 Group :
A- Connection :
Source Connection           : The SQL Server Instance the Jobs Crated on it .
Destination Connection : The SQL Server you need to referrer the jobs to it .
B- Jobs :
Transfer All Jobs : False if you don’t need to transfer All jobs and this is Default Value , True  if you need to transfer All jobs .
Job List : if you select The transfer All jobs is FALSE Select from here the Jobs list you need to transfer it to another Server .
C- Option :
If Object Exist : Meaning if the one Job from the List job you need to transfer it to another Server it’s Created already on this Server you will Select from this 3 Value
  • FailTask : If the job Found Fail The task.
  • Overwrite : if the job Found Overwrite on it .
  • Skip : if the job Found Skip this job
EnablejobsAtDistention : False = Disable , True = Enable .
After you finish your Configuration Click OK
Transfer Jobs_3
4- now we need to run the task by F5 or Click on play icon to execute the package.
5- Now Check your Distinction SQL Server Agent Jobs you will found the New Jobs you Selected it to Transfer 

Tuesday, May 3, 2016

Handling Data Consistency Errors in SQL Server Transactional Replication

Faced error in replication  "Violation Constraint, Cannot insert duplicate key error...." occurs replication breaks and this causes significant downtime on their production environment while they need to setup replication again, reinitialize and resynchronize. Unfortunately with transactional replication, this is totally normal behavior.

The common data consistency errors that can occur are:
  • 2601 Cannot insert duplicate key row in object '%.*ls' with unique index '%.*ls'
  • 20598 The row was not found at the Subscriber when applying the replicated command.
  • 2627 Violation of PRIMARY KEY constraint 'PK__A'. Cannot insert duplicate key in object 'dbo.A'.
Since real-time data replication is synchronous, it is an all-or-none proposition, meaning that in order to guarantee transactional consistency and atomicity, what ever transactions are committed to the publisher, must be committed to the subscriber. For example, a write operation (INSERT, UPDATE, DELETE) either completes on both sides or not at all. These are not considered complete until acknowledgement from the subscriber. Therefore, when there is a data consistency error, and the replication engine cannot guarantee consistency - the distribution agent stops.
Here is a typical violation of a Primary Key constraint error as shown by Replication Monitor:
violation of a primary key constraint error
Ultimately, you must investigate further as to the cause of these consistency errors, and fix the problem. However, there are some options that can allow Replication to continue while you find out the root cause which we will cover in this tip.
Solution
By default, when the Distribution Agent encounters any of the above-mentioned errors, the agent stops. However, there are some workarounds, that will prevent these consistency errors from interfering with replication and let it continue running. SQL Server will log these errors, which is very important, so you can come back to them, understand what the error condition is, why it is occurring, and resolve the issue.
There are some caveats of course, and it is recommended to use the workaround cautiously, as it is better to know why the error occurred or why the specific transaction needs to be skipped rather than resolved. We'll talk about some of these scenarios later on.

Skipping These Errors

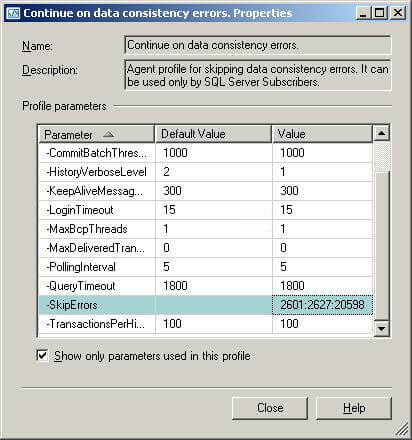
To have Replication "ignore" these errors, Microsoft provides us with a set of predefined replication agent files, that are installed on the Distributor. The one we are discussing is the Distribution Agent Profile, which defines parameters in the profiles for the Distribution Agent. Here we can find the -SkipErrors parameter that will skip errors 2601, 2627, and 20598 as described above.
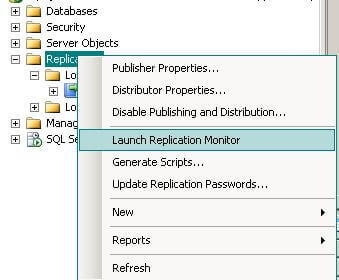
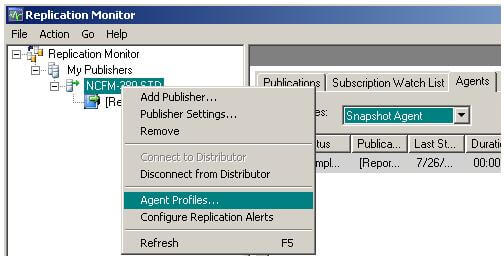
To change the default profile that the Distributor is using, you can access the Agent Profiles dialog box from Replication Monitor.
distribution agent profile
Once Replication Monitor is launched, you'll then need to drill-down to the publisher under "My Publishers", select the appropriate Publication, right-click and select "Agent Profiles" as shown here:
launch replication monitor
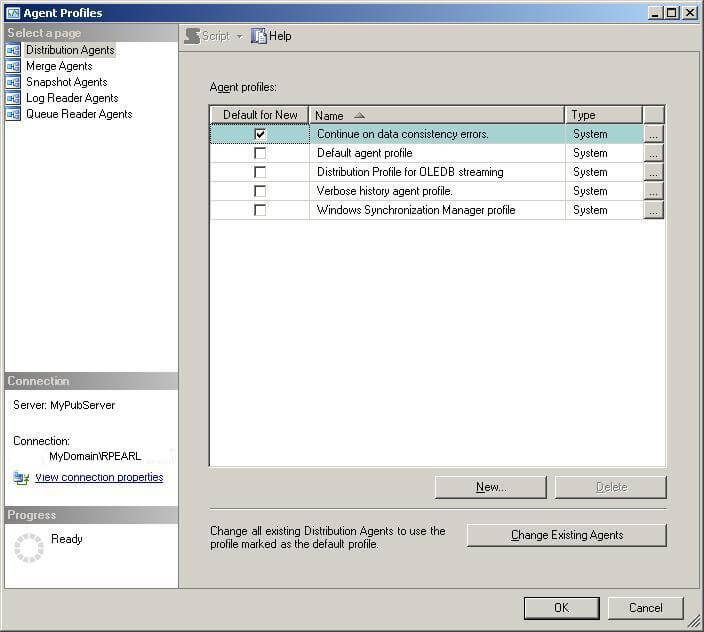
When the Agent Profiles window is displayed, make sure the "Distribution Agents" page is selected. Then in the Agent profiles section, click and select the "Default for New" checkbox for "Continue on data consistency errors".
make sure the distribution agents page is selected
You can click on the ellipsis button next to this profile, to view its parameters. The properties dialog box will open, and if you scroll down a bit, you will see the -SkipErrors Parameter, as highlighted below:
skip errors parameter
Finally, click , and then to set the new default profile for the Distribution Agent.

Enabling the Profile Changes

Before the new profile takes affect, you MUST restart the Distribution Agent. There are two ways to do this. I think this confuses most people, because there are various replication agents, but none specifically say "Distribution Agent".
  1. You can drill-down in SSMS to your Replication Folder --> Local Subscriptions
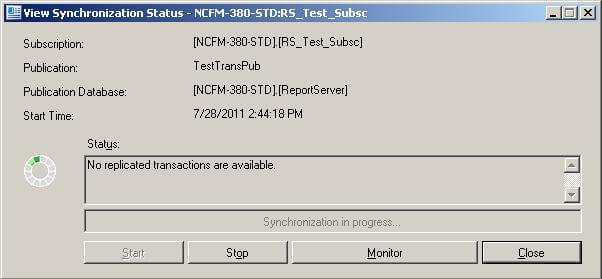
  2. Select your subscriber, and right click "View Synchronization Status" You will see the START/STOP buttons. This is your distribution agent.
  3. Click . A message will prompt you, "Are you sure you want to stop synchronizing? Data that has already been synchronized will not be rolled back"
  4. Click .
  5. Once the agent is stopped, then click to start synchronizing again.
drill-down in ssms to yor replication folder
To restart the distribution agent in T-SQL, you can run the following commands from a SQL Query Window, and must provide the specified parameter info:
-- To STOP the Distribution Agent:
sp_MSstopdistribution_agent @publisher, @publisher_db, @publication, @subscriber, @subscriber_db
 
--To START the Distribution Agent:
sp_MSstartdistribution_agent @publisher, @publisher_db, @publication, @subscriber, @subscriber_db
The Continue on Data Consistency Errors profile is now active.

Reasons Why Consistency Errors Occur in Replication

Now that we have told Replication to "skip" these errors, and carry on, this band-aid approach still needs to be looked at more closely. We need to answer, why are these errors occurring? Here are some of the reasons why:
  • Your subscriber should be "read-only". In other words, the only thing that should be writing to your Subscriber, is the Publisher. You need to check if you are doing ad-hoc updates, inserts, deletes of your own. (Applies to 1-way transactional replication)
  • Check to see if you have any triggers enabled at the subscriber. If triggers are fired, there could be INSERTS, UPDATES and DELETES putting duplicate rows in a table(s).
  • Check if you are replicating identity columns which can cause "duplicate key" errors, and primary key collisions.
  • Deferred Updates - UPDATE Statements May be Replicated as DELETE/INSERT Pairs - can cause constraint errors.
  • Make sure the publisher and subscriber are in-sync - Run Validations, or any data compare tool between the two databases.
You can view the logged consistency errors by executing the following query against the distribution database:
Use Distribution 
go 

select * from dbo.MSrepl_errors 
where error_code in ('2601','2627','25098')
Important information to help troubleshoot, such as the time, error details, and the xact_seqno, resides in this table. You will see similar output to this:
select from dbo.msrepl_errors

Rebuild MSDB Database

I had accidentally deleted the transaction log file of msdb database on a newly installed SQL Server 2008 R2 instance yesterday, while I was removing the old tempdb files. Although I normally copy the system database files prior removing the tempdb files from the default location, I missed it this time. When I connect to the instance, I received the following error:

MSDB_FailedtoConnect
I searched in Books Online and found this article about Rebuilding System Databases, which helps in rebuild the msdb database.
Steps to Follows
  1. Stop all the SQL Server services & start the command prompt with elevated administrative privilege & execute the following command:
    NET START MSSQLSERVER /T3608
  2. Once you start the SQL Server with trace flag 3608, you will be able to detach the msdb database. To do that, execute the following command in SQLCMD mode:
    SQLCMD -E -S DBS03 -dmaster -Q"EXEC sp_detach_db msdb"
  3. Rename the msdb data file, and execute the instmsdb.sql file from the install folder, as shown below:
    SQLCMD -E -S DBS03 -i"E:\SQL Server\MSSQL10_50.MSSQLSERVER\MSSQL\Install\instmsdb.sql" -o"E:\instmsdb.out"
  4. Review the instmsdb.out for any errors and re-apply the service packs.
  5. Stop the SQL Server.
  6. Start the SQL Server normally
StepstoFollow
Since I was able to connect to the instance without any error, I stopped the SQL Server instance and copy all the system databases files. Later I restarted the SQL Server Agent and the instance was online.

SQL Server Agent not listed as cluster resource

While installing SQL Database server 2008 R2 on a Windows 2008 R2 two node cluster, I encountered following problem. Thought of posting this so that this might be helpful for anyone faces the same problem.

The SQL cluster installation completed with failures.
Event Log:
Windows Event Log showed Error “SQLServerAgent could not be started (reason: Unable to connect to server (local); SQLServerAgent cannot start”.  With event ID 103
SQL Server Management Studio:
The SQL Server Management Studio was able to connect to database but the agent service is failed to start.
SQL Server Agent was missing in cluster resource listing.
To add missing agent resource, follow the below steps:
Step-1:  Add the SQL agent resource type:  Run command prompt with Administrator privilege and run
cluster restype “SQL Server Agent” /create /DLL:sqagtres.dll
Step-2:  Add the SQL agent resource: In the Failover Cluster Management, Click Add a resource from Action panel and then click More resources, select A-Add SQL Server Agent.
Note: Name the resource as “SQL Server Agent”, as this is case sensitive unless you are on CU3 or above for SQL Server 2008 RTM.
Right-click on the SQL Agent Resource and go to Properties and fill in values for the following two parameters.
VirtualServerName  (the network name specified while installing SQL cluster)
InstanceName(MSSQLSERVER for default instance  otherwise specify the named instance name).
Add all the SQL Server Resource as a dependency for the newly created SQL Server Agent resource.
Step-3 : Modify the registry entry: Open Registry Editor and browse to the following location.
If you are running Default Instance:
 HKEY_LOCAL_MACHINE\SOFTWARE\Microsoft\Microsoft SQL Server\MSSQL10.MSSQLSERVER\ConfigurationState
If you are running Named Instance:
HKEY_LOCAL_MACHINE\SOFTWARE\Microsoft \Microsoft SQL Server\MSSQL10.INSTNAME\ConfigurationState
Make sure that the values for all the keys present are 1. In case it is not, change it to 1.
Note:This will set the configuration state for all SQL features to 1, meaning the feature is installed and configured. A value greater than 1 indicates either an install failure or configuration failure.
Step-4 : bring the  SQL Server Agent online: go to the Failover Cluster Management and thenright clickon SQL Server Agent, bring online.

SQL Server Management Studio shows agent service as started.
Step-5: In case the SQL agent resource failed to come online, do a repair:
Launch the SQL Server Setup program (setup.exe) from SQL Server installation media. After prerequisites and system verification, the Setup program will display the SQL Server Installation Center page. Click Maintenance in the left-hand navigation area, and then click Repair to start the repair operation

Sunday, May 1, 2016

Transaction Isolation levels.

What is Read Uncommitted Isolation Level?

The Read Uncommitted Isolation level permits you to read uncommitted data.
The transaction is completed or not it doesn’t matter because It has never issued the share locks and it allows other transactions to modify data that you are reading.
Anytime you can read your data without any locking issues, but sometimes it generates unexpected results because the data returned by the SELECT are kind of dirty data or in a half state only.
Below is a small demonstration to read uncommitted data.
Now test this READ UNCOMMITTED isolation level:
First, create a table with sample data:
Open a new query window or session and executing this script:
During this 15 second delay, Open a new query window or session and try to SELECT this table under READ UNCOMMITED isolation level:
The result is, You can SELECT Uncommitted data.

What is SERIALIZABLE Isolation level?

THE SERIALIZABLE Isolation level is one kind of extended version of the REPEATABLE READ Isolation level of the SQL Server.
In REPEATABLE READ you get the same result by executing same SELECT statement because during your reading operation other cannot update the data, but others can insert the new records.
Now with the SERIALIZABLE Isolation level, you cannot modify the data while another transaction is reading the same data.You can not even read uncommitted data.
Other transactions cannot insert new rows with the key values that would fall in the range of keys read by any statements in the current transaction until the current transaction completes.
The lock also works based on key value range,
For example, you are selecting your data between ID 200 and ID 500 so all this data has been locked and another transaction cannot perform INSERT or UPDATE in this range data until the completion of the reading transaction.
Now test this REPEATABLE READ isolation level:
First, create a table with sample data:
Open a new query window or session and executing this script:
During this 15 second delay, Open a new query window or session and try to UPDATE data which are in key range:
The result is, You cannot UPDATE the data between ID 2 and ID 5.
During this 15 second delay, Open a new query window or session and try to INSERT a record which is in key range:
The result is, You cannot INSERT the data with ID 4 because it is between ID 2 and ID 5.
Important Note: here, The Primary Key is mandatory on the ID column because without primary key it locks the whole table so range value should be a Primary Key.

READ COMMITTED Isolation Level with the READ_COMMITTED_SNAPSHOT option

The READ COMMITTED is the default isolation level of SQL Server and it prevents the dirty reads.
Your SELECT statements always returns committed data.
It issues shared lock against the data where data are updating or having an exclusive lock so for selecting those data you have to wait to complete that transaction.
Now test this READ COMMITTED isolation level:
First, create a table with sample data:
Open a new query window or session and executing this script:
During this 15 second delay, Open a new query window or session and try to SELECT this table:
The result is, you can not SELECT your data until the UPDATE is not completed. As we have set a 15 second delay, so you have to wait for 15 second.
What is READ_COMMITTED_SNAPSHOT option?
This is very important and READ COMMITTED isolation level depends on this option ON / OFF setting.
It is by default OFF.
ALTER command to switch it ON / OFF:
READ_COMMITTED_SNAPSHOT OFF:
This is the default setting and issues the shared locks to prevent other transaction when we are reading or updating a table data.
Above small demonstration represents the behaviour of this default setting.
READ_COMMITTED_SNAPSHOT ON:
When the READ_COMMITTED_SNAPSHOT database option is ON, read committed isolation uses row versioning.
READ COMMITTED SNAPSHOT does optimistic reads and pessimistic writes. When data is updating, you can still read old version of data and there is no any share lock, but you cannot update that same data until the running update is not finished.
This is very different than Snapshot Isolation level.
It consumes less tempdb space than snapshot isolation.
In the Snapshot Isolation level, the same data causes an update conflict because same version of the row can be updated by two different transactions.
Now test the READ_COMMITTED_SNAPSHOT ON:
ALTER command to ON a READ_COMMITTED_SNAPSHOT:
Open a new query window or session and executing this script:
During this 15 second delay, Open a new query window or session and try to SELECT this table:
The result is, You can SELECT an old version of the data.
During this 15 second delay, Open a new query window or session and try to UPDATE same row:
The result is, You cannot perform an UPDATE on the same data.
REPEATABLE READ allows you to read the same data repeatedly and it makes sure that any transaction cannot update this data until you complete your reading.
If you are selecting same row twice in a transaction, you will get the same results both times.
If someone are modifying the data, you can not even read those data until they complete the update.
This is very similar to READ COMMITTED Isolation level.

What is REPEATABLE READ Isolation Level?

The REPEATABLE READ issues the shared locks on all statements which are in the transaction.
The shared locks do not release lock at each statement level, but it applies at transaction level.
The REPEATABLE READ does not stop insertion of newer records so when we are reading data with this isolation level, there is a chance to get Phantom or Dirty Reads.
For example,
You are selecting range data between ID 200 and ID 500 and in this range we have one free ID which is 394.
Now user is going to insert a new record with ID 394 and you are selecting data from multiple source so there are chances to get different results for your both SELECT statements.
Like one data set with ID 394 and other data set may be without ID 394.